Camera
- class pyasge.Camera(*args, **kwargs)
A 2D orthogonal camera class.
The Camera class is designed as a simple way to alter the view being drawn to the screen. The view described by the camera will be scaled to the viewport, so it is recommend to size it identically to the viewport or to at least use the same aspect ratio to prevent scaling artifacts. This basic implementation provides translation in the X and Y axis and use of Z to control the zoom level of the camera. In order to apply a translation to the camera, the translate function must be called.

Physically Based Rendering: From Theory To Implementation, © 2004-2019 Matt Pharr, Wenzel Jakob, and Greg Humphreys
Note
The default implementation is to move the camera by the requested translation amount. There is no damping or smoothing applied. If this is required, the class should be inherited from and the update function overridden.
Example
>>> self.camera = pyasge.Camera(1024, 768)
>>> self.camera.zoom = 0.5
>>> self.renderer.setProjectionMatrix(self.camera.view)
Overloaded function.
__init__(self: pyasge.Camera, width: float, height: float) -> None
__init__(self: pyasge.Camera, focal_point: pyasge.Point2D, width: float, height: float) -> None
- clamp(*args, **kwargs)
Overloaded function.
clamp(self: pyasge.Camera, view_bounds: pyasge.CameraView) -> None
Clamps the camera’s view.
It is often desirable to clamp the field of vision for the camera to ensure only specific regions of the game screen are shown. Consider a tile map where the camera should not exceed the width or height of the map. This function can be used to clamp the view to a set of predefined values, representing min_x, max_x, min_y and max_y. These would then be used to simply clamp the view’s x and y positions.
- param view_bounds
The four bounds to use in xy space.
- type view_bounds
An example of clamping to a map made from 128x128 tiles. The games design resolution is used to ensure only the visible game map is shown. The camera’s view is taken into consideration as this can affect the visible viewing area.>>> view = pyasge.CameraView() >>> view.min_x = self.game_res[0] * 0.5 * self.camera.zoom, >>> view.max_x = self.map.width * 128 - self.game_res[0] * 0.5 * self.camera.zoom, >>> view.min_y = self.game_res[1] * 0.5 * self.camera.zoom, >>> view.max_y = self.map.height * 128 - self.game_res[1] * 0.5 * self.camera.zoom >>> self.camera.clamp(view)
Note
This version of the function uses the
CameraViewdata structure.clamp(self: pyasge.Camera, view_bounds: list) -> None
Clamps the camera’s view.
It is often desirable to clamp the field of vision for the camera to ensure only specific regions of the game screen are shown. Consider a tile map where the camera should not exceed the width or height of the map. This function can be used to clamp the view to a set of predefined values, representing min_x, max_x, min_y and max_y. These would then be used to simply clamp the view’s x and y positions.
- param view_bounds
The four bounds to use in xy space
- type view_bounds
Note
This version of the function uses a python style list, comprising of four float values, representing the bounds of the view.
An example of clamping to a map made from 128x128 tiles. The games design resolution is used to ensure only the visible game map is shown. The camera’s view is taken into consideration as this can affect the visible viewing area.>>> view = [ >>> self.game_res[0] * 0.5 * self.camera.zoom, >>> self.map.width * 128 - self.game_res[0] * 0.5 * self.camera.zoom, >>> self.game_res[1] * 0.5 * self.camera.zoom, >>> self.map.height * 128 - self.game_res[1] * 0.5 * self.camera.zoom >>> ] >>> self.camera.clamp(view)
- lookAt(self: pyasge.Camera, focal_point: pyasge.Point2D) None
Sets the camera’s focal point, which controls the centering of the frame. For example directing the camera to focus at {0,0} will center {0,0} in the middle of the frame.
- property position
The camera’s position on the XY axis
- resize(self: pyasge.Camera, width: float, height: float) None
Resizes the camera’s view.
- translate(self: pyasge.Camera, x: float, y: float, zoom: float) None
Sets the camera’s translation and zoom value.
Moves the camera to the x and y specified co-ordinates and also updates the zoom level. Could be useful for resetting the camera to a predefined position and zoom level.
- translateX(self: pyasge.Camera, x: float) None
Sets the camera’s position on the x axis
- translateY(self: pyasge.Camera, y: float) None
Sets the camera’s position on the y axis
- translateZ(self: pyasge.Camera, zoom: float) None
Sets the camera’s zoom level
- update(self: pyasge.Camera, game_time: pyasge.GameTime) None
Updates the camera.
Out of the box there’s no smoothing, interpolation or damping of the camera’s movements. In order to allow greater custom behaviour, this function can be overridden by a child class and custom movement logic added.
- property view
A view that describes the camera’s framing.
Use this to frame the action, which in turn is rendered to the window. This view can be used directly to control the projection matrix used for mapping to the game window. Everything inside the view will be mapped directly to the screens viewport. The bounding volume controls the depth of items rendered.

Physically Based Rendering: From Theory To Implementation, © 2004-2019 Matt Pharr, Wenzel Jakob, and Greg Humphreys
Note
As this is an orthographic view, the same rendered object will occupy an exact amount of screen space, regardless of its distance from the camera. There is no vanishing point in play. For example given a viewport that maps directly to the window size, a 100x100 sized sprite will use 100x100 pixels irrespective of its distance.
Example
>>> self.renderer.setProjectionMatrix(camera.view)
- Returns
Returns a struct used to represent the camera’s view.
- Type
CameraView
- class pyasge.CameraView(self: pyasge.CameraView) None
A an orthogonal camera view class.
The camera view class describes a bounding box that is used to map the game world to the camera’s lens. Objects outside of the the view will not be rendered. The camera view can be applied to the renderer during the drawing phase of the game. It’s possible to swap camera views during a render cycle. The easiest way to generate the view is to use a Camera class, assign it a width and height and update its focal point using
lookAt.
glm::ortho, © Knowww 2017
Example
>>> self.camera = pyasge.Camera(1024, 768)
>>> self.camera = pyasge.Camera(1024, 768)
>>> self.camera.lookAt(pyasge.Point2D(0, 0))
>>> self.renderer.setProjectionMatrix(self.camera.view)
Attributes
|
The minimum x world position. |
|
The maximum x world position. |
|
The minimum y world position. |
|
The maximum y world position. |
Colour
- class pyasge.Colour(*args, **kwargs)
Used to represent the RGB values of a colour.
Example
>>> self.colour = pyasge.COLOURS.AQUA      # predefined
>>> self.colour = pyasge.Colour(1, 0, 0)   # red
>>> self.colour = [0, 1, 0]                # green
>>> self.colour = (1, 0, 1)                # purple
Overloaded function.
__init__(self: pyasge.Colour, red: float = 0, green: float = 0, blue: float = 0) -> None
__init__(self: pyasge.Colour, rgb: List[float[3]]) -> None
__init__(self: pyasge.Colour, arg0: pyasge.Colour) -> None
Attributes
|
The red component of the colour. |
|
The green component of the colour. |
|
The blue component of the colour. |
CursorMode
- class pyasge.CursorMode(self: pyasge.CursorMode, value: int) None
Mouse cursor modes.
Members:
NORMAL : Enables the cursor. The cursor will be shown and the user is free to leave the window and interact with other applications.
HIDDEN : The cursor is no longer shown when positioned over the active game window, however, upon leaving the window the cursor will be shown, allowing interaction outside of the game window.
LOCKED : Simply, the cursor will be hidden and locked to the window. The userwill not be able to leave the windowed area.
- property name
EventType
- class pyasge.EventType(self: pyasge.EventType, value: int) None
Input Event.
Input events are signalled when specific inputs are detected. These include key presses, mouse button clicks, mouse movements and mouse scrolling. When the framework receives one of these events, it forwards the data packaged in one of these EventType classes. They contain all the relevant information about the event itself.
Members:
E_KEY : A key has been pressed or released.
E_MOUSE_CLICK : A mouse click event.
E_MOUSE_SCROLL : A mouse scrolling event.
E_MOUSE_MOVE : The mouse has been moved..
- property name
Font
- class pyasge.Font(self: pyasge.Font) None
A loaded instance of a Font.
Before font’s can be used in the rendering of text they need to be loaded by the renderer. On successful loading of a font this instance is returned which can then be attached to text for rendering use.
Example
>>> '''load font using renderer'''
>>> self.font = self.renderer.loadFont("/data/fonts/kenvector_future.ttf", 40)
>>>
>>> '''attach font to a text object'''
>>> self.text = pyasge.Text(self.font, "Hello World")
>>>
>>> '''pixel distance checks'''
>>> print(self.font.pxWide('c', 1))
>>> print(self.font.pxWide("cat", 1))
Warning
Without a font instance it is not possible to render using any other font than the default provided by the engine. This is due to the way the font’s are converted into renderable glyphs and stored in the game engine.
- boundsY(self: pyasge.Font, string: str, scale: float) Tuple[float, float]
Calculates the bounding height for the string.
Calculates the deviation in the Y axis from the top of the rendered string to the bottom. The function takes in to account the multiple lines by adding appropriate amounts of spacing and also the individual bearings of each character glpyh.
Example
>>> '''load font using renderer'''
>>> self.font = self.renderer.loadFont("/data/fonts/kenvector_future.ttf", 40)
>>>
>>> '''attach font to a text object'''
>>> print(self.font.boundsY("Where are you?", 2.0))
- pxHeight(self: pyasge.Font, string: str, scale: float) float
How tall the the bearing on the first line or text will be in pixels.
- pxWide(*args, **kwargs)
Overloaded function.
pxWide(self: pyasge.Font, string: str, scale: float = 1.0) -> float
How wide the string will be in pixels.
pxWide(self: pyasge.Font, char: str, scale: float = 1.0) -> float
How wide the character will be in pixels.
- setMagFilter(self: pyasge.Font, mag_filter: pyasge.MagFilter) None
Game
- class pyasge.ASGEGame(*args, **kwargs)
Bases:
pybind11_builtins.pybind11_objectAn OpenGL game based on the ASGE Framework.
A structure and interface for running an instance of an ASGE Game. Its primary focus is on storing access to the renderer and the input system, along with the running of a simple game loop. The input system is intrinsically linked to the renderer subsystem due to needing access to the window for polling events. To help speed up development, a typical
fixedUpdate,updateandrenderfunction is provided, along with a struct representing GameTime. In order to create an instance of the game, an inherited class is needed which overrides the update and render functions.Example
>>> class MyASGEGame(pyasge.ASGEGame):
>>>   def __init__(self, settings):
>>>     pyasge.ASGEGame.__init__(self, settings)
>>>     self.handler = \
>>>       self.inputs.addCallback(pyasge.EventType.E_KEY, self.key_handler)
>>>
>>>   def key_handler(self, event : pyasge.KeyEvent) -> None:
>>>     pass
>>>
>>>   def update(self, game_time : pyasge.GameTime) -> None:
>>>     pass
>>>
>>>   def render(self, game_time : pyasge.GameTime) -> None:
>>>     pass
>>>
>>>
>>> def main():
>>>   settings = pyasge.GameSettings()
>>>   settings.window_width = 608
>>>   settings.window_height = 1080
>>>   game = MyASGEGame(settings)
>>>   game.run()
Overloaded function.
__init__(self: pyasge.ASGEGame) -> None
__init__(self: pyasge.ASGEGame, arg0: pyasge.GameSettings) -> None
- fixed_update(self: pyasge.ASGEGame, gametime: pyasge.GameTime) None
Used to update the game using fixed time-steps instead of the regular frame update.
This is useful when you only want to progress the game world i.e. physics with a deterministically known amount. It is best to use fixed updates as a divisible or multiple of the FPS count. This allows a smoother delivery of frame data. For example: 60/120 would deliver one fixed update per two renders. Under heavy load, code executed in this function will cause the game to become sluggish. Care should be taken to ensure the fixed update rate set can be met.
- Parameters
gametime (pyasge.GameTime) – Delta game time measurements.
Note
You can find the amount of time between fixed time-steps by accessing the fixed_delta and fixed_time fields on the game time instance. This is the requested fixed time-step specified in the game settings.
See also
- property inputs
The inputs event manager.
- render(self: pyasge.ASGEGame, gametime: pyasge.GameTime) None
Renders the game scene.
All rendering actions should be processed inside this function. Before render is called the graphics pipeline will be flushed and reset ready for rendering to commence. Game objects should have already been updated in the corresponding update function. Updating them in the render function can result in unexpected graphical issues.
- Parameters
gametime (pyasge.GameTime) – Delta game time measurements.
See also
- property renderer
The renderer responsible for the window.
- run(self: pyasge.ASGEGame) int
Starts the game loop.
- signalExit(self: pyasge.ASGEGame) None
Calling this will cause the window and the game to shutdown.
- signal_exit(self: pyasge.ASGEGame) None
Calling this will cause the window and the game to shutdown.
- toggleFPS(self: pyasge.ASGEGame) None
- update(self: pyasge.ASGEGame, gametime: pyasge.GameTime) None
Used to update the game world using variable time-steps. You can think of this as the "render update" and will always run once before the frame is rendered.
Typically this is where you would process objects that are changed over time but do not need to be deterministic in their nature. Examples include operations such as animation and skinning. If the CPU becomes bogged down in FixedUpdate, a frame will be drawn but the amount of game time will be shortened, resulting in slower movement. Unity suggests that physics related code goes in
fixed_updateand the rest of your logic goes here. This is generally good advice to beginners who lack experience.- Parameters
gametime (pyasge.GameTime) – Delta game time measurements.
Note
You can find the amount of time between fixed time-steps by accessing the fixed_delta and fixed_time fields on the game time instance. This is the requested fixed time-step specified in the game settings.
See also
GameSettings
- class pyasge.GameSettings(self: pyasge.GameSettings) None
GameSettings allows you to configure the game window and its initial state upon construction of the game. You could easily use a GUI to create an instance of GameSettings and then construct the game using it.
Example
>>> settings = pyasge.GameSettings()
>>> settings.window_width = 608
>>> settings.window_height = 1080
>>> settings.window_mode = pyasge.WindowMode.BORDERLESS_FULLSCREEN
>>> game = MyASGEGame(settings)
>>> game.run()
- property fixed_ts
Controls the pacing of the fixed time-step update function.
- Getter
Returns the desired delta between update calls.
- Setter
Sets the desired fixed time-step delta.
- Type
- property fps_limit
Attempts to limit the game’s FPS
- Getter
Returns the FPS limit
- Setter
Sets desired FPS cap
- Type
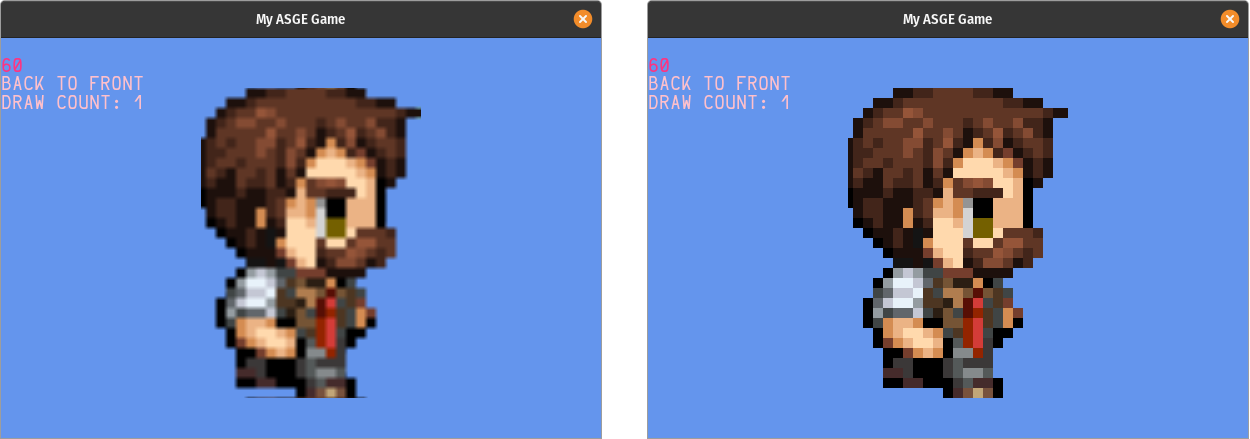
- property mag_filter
Sets the default magnification filter to use for the game.
- Getter
Returns the MagFilter to use by default
- Setter
Sets the default MagFilter to use when scaling upwards
- Type
- property msaa_level
Controls the pacing of the fixed time-step update function.
- Getter
Returns the desired delta between update calls.
- Setter
Sets the desired fixed time-step delta.
- Type
- property vsync
The vsync mode to attempt to use.
- Getter
Returns the requested vsync mode
- Setter
Sets the requested vsync mode
- Type
- property window_height
The requested window height for the game.
- Getter
Returns requested window height
- Setter
Sets the requested window height
- Type
- property window_mode
The window mode to use.
- Getter
Returns the window mode
- Setter
Sets the window mode to try and use
- Type
- property window_title
Each window has a title, customise yours.
- Getter
Returns the requested window title
- Setter
The window title to apply
- Type
- property window_width
The requested window width for the game.
- Getter
Returns requested window width
- Setter
Sets the requested window width
- Type
GamePad
- class pyasge.GamePad
Data for connected gamepad. Data that represents the current state of a connected game pad. Includes the number of axis and buttons along with their current state. If a gamepad is not connected then the status of is_connected will be false. Do not work with non connected devices as it will lead to undefined behaviour. Currently, gamepad support is via polling and not events.
Example
>>> if self.inputs.getGamePad().connected:
>>>
>>>    '''use gamepad to adjust players velocity'''
>>>    self.player.velocity.x = self.inputs.getGamePad().AXIS_LEFT_X
>>>    self.player.velocity.y = self.inputs.getGamePad().AXIS_LEFT_Y
>>>
>>>    '''check to see if we should fire a at the enemy'''
>>>    if self.inputs.getGamePad().A:
>>>       self.player.fire()
>>>
>>>    '''check to see if we should exit the game'''
>>>    if self.inputs.getGamePad().START:
>>>       self.signalExit()
Warning
You must ensure the device is connected before attempting to use it as the axis and button data will be invalid if it is not and accessing it will lead to undefined behaviour or crashing
- property AXIS_LEFT_X
The reading of the x-axis on the left stick.
- Getter
Returns the the x-axis value between [-1,1]
- Type
Example
>>> if self.inputs.getGamePad(0).connected:
>>>   print(f"axis reads: {self.inputs.getGamePad(0).AXIS_LEFT_X}")
- property AXIS_LEFT_Y
The reading of the y-axis on the left stick.
- Getter
Returns the the x-axis value between [-1,1]
- Type
Example
>>> if self.inputs.getGamePad(0).connected:
>>>   print(f"axis reads: {self.inputs.getGamePad(0).AXIS_LEFT_Y}")
- property AXIS_RIGHT_X
The reading of the x-axis on the right stick.
- Getter
Returns the the x-axis value between [-1,1]
- Type
Example
>>> if self.inputs.getGamePad(0).connected:
>>>   print(f"axis reads: {self.inputs.getGamePad(0).AXIS_RIGHT_X}")
- property AXIS_RIGHT_Y
The reading of the y-axis on the right stick.
- Getter
Returns the the y-axis value between [-1,1]
- Type
Example
>>> if self.inputs.getGamePad(0).connected:
>>>   print(f"axis reads: {self.inputs.getGamePad(0).AXIS_RIGHT_Y}")
- property CIRCLE
The CIRCLE button state.
- Getter
Returns the down state of the CIRCLE button.
- Type
- property CROSS
The CROSS button state.
- Getter
Returns the down state of the CROSS button.
- Type
- property DPAD_DOWN
The DPAD_DOWN button state.
- Getter
Returns the down state of the DPAD_DOWN button.
- Type
- property DPAD_LEFT
The DPAD_LEFT button state.
- Getter
Returns the down state of the DPAD_LEFT button.
- Type
- property DPAD_RIGHT
The DPAD_RIGHT button state.
- Getter
Returns the down state of the DPAD_RIGHT button.
- Type
- property DPAD_UP
The DPAD_UP button state.
- Getter
Returns the down state of the DPAD_UP button.
- Type
- property GUIDE
The GUIDE button state.
- Getter
Returns the down state of the GUIDE button.
- Type
- property LEFT_BUMPER
The LEFT_BUMPER button state.
- Getter
Returns the down state of the LEFT_BUMPER button.
- Type
- property LEFT_THUMB
The LEFT_THUMB button state.
- Getter
Returns the down state of the LEFT_THUMB button.
- Type
- property LEFT_TRIGGER
The reading of the axis on the left trigger.
- Getter
Returns the the axis value between [-1,1]
- Type
- property RIGHT_BUMPER
The RIGHT_BUMPER button state.
- Getter
Returns the down state of the RIGHT_BUMPER button.
- Type
- property RIGHT_THUMB
The RIGHT THUMB button state.
- Getter
Returns the down state of the RIGHT THUMB button.
- Type
- property RIGHT_TRIGGER
The reading of the axis on the right trigger.
- Getter
Returns the the axis value between [-1,1]
- Type
- property SQUARE
The SQUARE button state.
- Getter
Returns the down state of the SQUARE button.
- Type
- property START
The START button state.
- Getter
Returns the down state of the START button.
- Type
- property TRIANGLE
The TRIANGLE button state.
- Getter
Returns the down state of the TRIANGLE button.
- Type
- property connected
Whether or not the gamepad is currently connected. It’s possible that a gamepad device may get disconnected during use, this can be used to ensure it’s connected.
- Getter
Returns True if connected
- Type
Example
>>> if self.inputs.getGamePad().connected:
>>>   print("Gamepad at idx is connected)
- property index
Each controller attached to the system has an index. This property can retrieve it.
- Getter
Returns the connected index for the GamePad.
- Type
Example
>>> print(f"index of controller reads: {self.inputs.getGamePad().index}")
- property name
Whether or not the gamepad is currently connected. It’s possible that a gamepad device may get disconnected during use, this can be used to ensure it’s still connected.
- Getter
Returns True if connected
- Type
Example
>>> if self.inputs.getGamePad().connected:
>>>   print("Gamepad at idx is connected)
GameTime
- class pyasge.GameTime(self: pyasge.GameTime) None
Stores both frame and game deltas.
Stores various measurements of delta time for the game. It will store the current time point which is used to calculate the delta between frames, the delta of the last frame and the entire delta since the game started. This can be used to control simulations and render functions to use non-fixed time steps.
- property elapsed
Total elapsed game time.
- property fixed_delta
Returns the fixed time-step interval. Use for
fixedUpdatefunction.
- property fixed_timestep
The time-step between fixed updates in seconds.
- property frame_delta
Returns the delta time between rendered frames. Use for
renderfunction.
- property frame_time
The delta time between rendered frames in seconds.
Input
- class pyasge.Input(self: pyasge.Input) None
The input handler system.
The input class is designed to work alongside the renderer and is responsible for sending events to interested parties. It will also provide helper functions that can retrieve non-event driven data such as the cursor position or the gamepad status. Much of the underlying implementation will be platform specific, whilst offering a compatible interface.
- addCallback(self: pyasge.Input, arg0: pyasge.EventType, arg1: Callable[[pyasge.EventData], None]) str
Registers a callback function.
Registers a function that gets called upon a subscribed event type. Supports both keyboard and mouse functions. Gamepads do not use events and must be individually polled.
Example
>>> self.inputs.addCallback(pyasge.EventType.E_KEY,          self.key_handler)
>>> self.inputs.addCallback(pyasge.EventType.E_MOUSE_CLICK,  self.mouse_click)
>>> self.inputs.addCallback(pyasge.EventType.E_MOUSE_MOVE,   self.mouse_move)
>>>
>>> def input(self, event: pyasge.KeyEvent) -> None:
>>>   print(f"key press received. {event.key}")
>>>   print(f"mods received. {event.mods}")
>>>   if event.mods & pyasge.KEYS.MOD_SHIFT:
>>>     print("Shift set")
>>>
>>> def move_event(self, event: pyasge.MoveEvent) -> None:
>>>   print(f"x position: {event.x}")
>>>   print(f"y position: {event.y}")
>>>
>>> def click_event(self, event: pyasge.ClickEvent) -> None:
>>>   print(f"x button: {event.button}")
>>>   print(f"action: {event.action}")
>>>   print(f"x position: {event.x} \ny position: {event.y}")
- property gamepads
Returns all connected gamepad states.
- Getter
Returns the down state of the A button.
- Type
pyasge.GamePads
- getCursorPos(self: pyasge.Input) pyasge.Point2D
Retrieves the mouse cursor position.
- Getter
Returns the down state of the A button.
- Type
- getGamePad(*args, **kwargs)
Overloaded function.
getGamePad(self: pyasge.Input, index: int) -> pyasge.GamePad
Retrieves gamepad data for the controller at the requested index.
If no gamepad can be found at the given index the boolean connected is set to false. This can be used to check if a gamepad is no longer present. Useful for checking to see if it’s been suddenly unplugged.
- param
The controller index to retrieve data for.
- return
pyasge.GamePad
getGamePad(self: pyasge.Input) -> pyasge.GamePad
Retrieves the first connect gamepad.
If no gamepad can be found then the boolean connected is set to false. This can be used to check if a gamepad is present and recognised by the game framework.
- return
pyasge.GamePad
- removeCallback(self: pyasge.Input, id: str) None
Removes a registered callback.
Will attempt to remove a registered callback function using a given ID. The ID is returned from the addCallback function and should be retained to allow removal of the event subscription when it’s no longer required.
Warning
Failing to remove a registered callback to an object that no longer exists will result in undefined behaviour. Always remove the callback when it is no longer required.
- setCursorMode(self: pyasge.Input, cursor_mode: pyasge.CursorMode) None
Sets the cursor mode for the mouse.
InputEvents
- class pyasge.ClickEvent(self: pyasge.ClickEvent) None
A click event provides any related information that can be used to drive a game through mouse clicks. The event details whether the mouse button was pressed or released, the button involved and also its x and y position on the screen. This positional data can be translated back to world space and used to establish where the user was clicking.
Example
>>> import pyasge
>>> def click_event(self, event: pyasge.ClickEvent) -> None:
>>> print(f"button: {event.button}")
>>> print(f"action: {event.action}")
>>> print(f"x position: {event.x} \ny position: {event.y}")
- property action
Button action. Has it been pressed or released?
- property button
Mouse button. The mouse button clicked. pyasge.Input.BUTTON_PRESSED
- property mods
Modifiers. Any modifiers applied i.e. ctrl, shift etc.
- property x
The current mouse position on the X axis.
- property y
The current mouse position on the Y axis.
- class pyasge.KeyEvent(self: pyasge.KeyEvent) None
A key event provides any related information that can be used to drive a game. Along with the key that’s involved in the action, the event provides details of whether it was pressed or released. This can help create logic based on both key releases and key presses.
Example
>>> import pyasge
>>> def key_handler(event: pyasge.KeyEvent) -> None:
>>>   if event.key is pyasge.KEYS.KEY_ENTER:
>>>     if event.action is pyasge.KEYS.KEY_PRESSED:
>>>       print("enter key press received.")
>>>   if event.mods & pyasge.KEYS.MOD_SHIFT:
>>>     print("shift key held")
- property action
Whether the key was pressed or released.
- property key
The key involved in the event.
- property mods
Any modifiers applied i.e. ctrl, shift etc.
- property scancode
The unique scancode used to to represent the character.
- class pyasge.MoveEvent(self: pyasge.MoveEvent) None
A mouse movement event provides any related information that can be used to drive a game. This simply reports the x and y position of the mouse when the movement was detected.
Example
>>> import pyasge
>>> def scroll_event(self, event: pyasge.ScrollEvent) -> None:
>>> print(f"xpos: {event.x} \nypos: {event.y}")
- property x
The current mouse position on the X axis.
- property y
The current mouse position on the Y axis.
- class pyasge.ScrollEvent(self: pyasge.ScrollEvent) None
A scroll event is generated when the mouse scroll wheel is moved. The data provided with this event is actually the delta in motion. This can be used to determine how far the wheel has been moved.
Example
>>> import pyasge
>>> def scroll_event(self, event: pyasge.ScrollEvent) -> None:
>>> print(f"x delta: {event.x_delta} \ny delta: {event.y_delta}")
- property x_delta
Delta X. The amount of change incurred by the scrolling action.
- property y_delta
Delta Y. The amount of change incurred by the scrolling action.
Magfilter
- class pyasge.MagFilter(self: pyasge.MagFilter, value: int) None
Magnification filter types.
When zooming in on textures, the engine supports two methods of filtering. The type of filtering applied will control the sharpness of the image. Nearest neighbour filtering is popular for low-bit assets, as it doesn’t blur the image, but it has a “chunky” appearance.”
Members:
- property name
Point2D
- class pyasge.Point2D(*args, **kwargs)
Represents a point in 2D.
Overloaded function.
__init__(self: pyasge.Point2D) -> None
__init__(self: pyasge.Point2D, x: float = 0, y: float = 0) -> None
__init__(self: pyasge.Point2D, arg0: pyasge.Point2D) -> None
__init__(self: pyasge.Point2D, arg0: List[float[2]]) -> None
- distance(self: pyasge.Point2D, arg0: pyasge.Point2D) float
Given two points, calculate the distance between them.
- midpoint(self: pyasge.Point2D, arg0: pyasge.Point2D) pyasge.Point2D
Calculates the midpoint between two different points.
- property x
x coordinate
- property y
y coordinate
PixelBuffer
- class pyasge.PixelBuffer(self: pyasge.PixelBuffer, texture: pyasge.Texture) None
A pixel buffer that resides on the GPU
Pixel buffers allow retrieval and updating of individual pixels stored on the GPU. This class acts as a proxy between the hosts memory and the GPU. It works by storing a local copy of the pixel data, which can then be read from or modified and uploaded back on to the GPU.
- Parameters
texture (Texture) – The texture this pixel buffer is assigned to.
- property data
The pixel data
This is the CPU copy of the pixel data used to represent a texture. The data itself is stored as a range of bytes and is treated as a numpy array in order to allow it to be accessed without copying. Adjusting the pixel data will not automatically update the GPU. To do this an upload function call is required.
Example
>>> '''Upload pixel data directly'''
>>> blocks = numpy.full((200, 600), 65, dtype='B')
>>> self.sprite = pyasge.Sprite()
>>> self.sprite.width = 200
>>> self.sprite.height = 200
>>> self.texture = self.renderer.createNonCachedTexture(200, 200, pyasge.Texture.Format.RGB, None)
>>> self.sprite.attach(self.texture)
>>> self.texture.buffer.upload(blocks, 0)
>>>
>>> '''Edit an existing texture'''
>>> def update(self, game_time):
>>>   with numpy.nditer(self.texture.buffer.data, op_flags=['readwrite'], order='C') as it:
>>>     for x in it:
>>>       x[...] = numpy.random.randint(0, 256)
>>>   self.texture.buffer.upload()

- download(self: pyasge.PixelBuffer, mip_level: int = 0) None
Schedules a download from the GPU
Use this function when you wish to retrieve a copy of the texture currently stored on the GPU. This can be used to overwrite the local buffer, for example if you want to restore it to the version currently in GPU memory.
- Parameters
mip_level - the mip level to download, defaults to 0
- property height
The buffers height in pixels.
- Returns
The height allocated for the pixel buffer.
- Return type
- stale(self: pyasge.PixelBuffer) bool
Is the local buffer out of date?
Downloads from the GPU are asynchronous. When a download is requested it does not immediately update the contents of the local pixel buffer, instead it sets the stale flag to true. This flag is reset and the local buffer updated when the data is next retrieved.
- Returns
true if the local pixel data need updating
- Return type
- upload(*args, **kwargs)
Overloaded function.
upload(self: pyasge.PixelBuffer, mip_level: int = 0) -> None
Uploads the data to the GPU
Use this function to upload the CPU pixel buffer onto the GPU. When complete, the transfer will replace any existing texture data resident on the GPU. Please note: you can not revert the data unless you have a backup of the pixel buffer array.
- Parameters
mip_level (int) - the mip level to download, defaults to 0.
upload(self: pyasge.PixelBuffer, buffer: numpy.ndarray[numpy.uint8], mip_level: int = 0) -> None
Uploads the data to the GPU
Use this function to take a copy of a pre-existing array of bytes, and then upload the resultant buffer to the GPU. The array passed in must be the same size or larger than the pixel buffer’s width and height to prevent out of bounds access.
- Parameters
buffer (array_like) - An existing array of bytes to copy.
mip_level (int) - the mip level to download, defaults to 0.
Renderer
- class pyasge.Renderer
An OpenGL renderer.
The renderer is the heart and sole of the engine. It’s responsible for managing rendering, shaders, input initialisation, the window etc. ASGE currently only supports OpenGL but utilises two different renderers based on the supported OpenGL version available. The modern renderer which targets 4.5+, will make use of features such as SSBOs and named bindings. The legacy renderer is retained to allow support on Mac OSX and older GPU drivers and requires OpenGL 3.3, but not maintain feature parity going forwards.
A copy of the renderer is attached to each ASGEGame and can be used for rendering, managing textures, updating pixel buffers and basic window management.
Example
>>> '''load font and create text instance'''
>>> font = self.renderer.loadFont("/data/fonts/font.ttf", 40)
>>> text = pyasge.Text(self.font, "Hello World")
>>>
>>> ''' render to texture '''
>>> self.renderer.setRenderTarget(self.rt)
>>> self.renderer.setViewport(pyasge.ViewPort(0, 0, 1024, 768))
>>> self.renderer.setProjectionMatrix(self.camera.view)
>>> self.renderer.render(self.sprite)
>>>
>>> ''' render texture to screen '''
>>> self.renderer.setRenderTarget(None)
>>> self.renderer.setViewport(pyasge.ViewPort(0, 0, 1024, 768))
>>> self.renderer.render(self.sprite)
>>>
- createCachedTexture(self: pyasge.Renderer, id: str) ASGE::Texture2D
Loads a texture using the rendering cache subsystem.
- createNonCachedTexture(*args, **kwargs)
Overloaded function.
createNonCachedTexture(self: pyasge.Renderer, file: str) -> pyasge.Texture
Attempts to create a non-cached texture file by loading a local file.
createNonCachedTexture(self: pyasge.Renderer, width: int, height: int, format: pyasge.Texture.Format, data: capsule) -> pyasge.Texture
Creates a non-cached texture of a given size and format.
- getDefaultFont(self: pyasge.Renderer) pyasge.Font
Returns the Engine’s default font.
- initPixelShader(self: pyasge.Renderer, shader_source: str) pyasge.Shader
Initialises a pixel shader from a str.
- Returns
The initialised pixel shader.
- Type
Example
>>> frag_shader = """
>>> #version 330 core
>>> #define FRAG_COLOUR     0
>>> in VertexData
>>> {
>>>   vec2    uvs;
>>>   vec4    rgba;
>>> } fs_in;
>>> uniform float alpha;
>>> uniform sampler2D image;
>>> layout  (location = FRAG_COLOUR, index = 0) out vec4 FragColor;
>>> void main()
>>> {
>>>    FragColor = vec4(fs_in.rgba.rgb, alpha) * texture(image, fs_in.uvs);
>>> }
>>> """
>>>
>>> inline_shader = self.renderer.initPixelShader(frag_shader)
- loadFont(self: pyasge.Renderer, path: str, size: int, range: float = 2.0) pyasge.Font
Loads a font from the file system.
In order to render fonts the renderer needs to generate a texture atlas. This atlas stores each glyph that might need to be rendered along with its respective UV co-ordinates. Once loaded a font can be assigned to any text that needs rendering.
Note
If the font file can not be loaded successfully, None will be returned.
- loadFontAtlas(self: pyasge.Renderer, metrics: pyasge.AtlasMetrics, img_path: str, csv_path: str) pyasge.Font
Loads a font atlas from the file system.
Use msdf-atlas-gen to create a font atlas, which can then be imported in to the game. In order to successfully map the glyph information it needs additional data on both the font face metrics but also the glyph positioning. The metrics are provided using a AtlasMetric data structure and the UV positioning and unicode information via a CSV file. Using these a font can be loaded without having to rely on runtime generation.
Note
If the font file can not be loaded successfully, None will be returned.
- loadPixelShader(self: pyasge.Renderer, arg0: str) pyasge.Shader
Loads and initialises a pixel shader from a local file.
- loadTexture(self: pyasge.Renderer, path: str) ASGE::Texture2D
Loads a texture using the rendering cache subsystem.
- render(*args, **kwargs)
Overloaded function.
render(self: pyasge.Renderer, sprite: pyasge.Sprite) -> None
render(self: pyasge.Renderer, tile: pyasge.Tile, x: float, y: float) -> None
render(self: pyasge.Renderer, text: pyasge.Text) -> None
render(self: pyasge.Renderer, texture: pyasge.Texture, x: int, y: int, z: int = 0) -> None
render(self: pyasge.Renderer, texture: pyasge.Texture, x: int, y: int, width: int, height: int, z: int = 0) -> None
render(self: pyasge.Renderer, texture: pyasge.Texture, rect: list, x: int, y: int, width: int, height: int, z: int = 0) -> None
- property resolution_info
The renderer’s resolution information.
The renderer is responsible for overseeing the current window and desktop resolutions as well as the most recently applied viewport and camera views. All of this information can easily be retrieved using this function. For example, it’s simple to obtain the window’s width and height or the currently set viewport.
Note
When the user requests a new viewport or camera view, the renderer stores this request in a render state. This state is then attached to the rendering batches and they will apply these settings when it comes time to dispatch the draw counts.
- Getter
Returns the resolution and current render view settings.
- Type
- setBaseResolution(self: pyasge.Renderer, width: int, height: int, policy: pyasge.ResolutionPolicy) None
The base design resolution of the game.
When designing the game this resolution is used to control how the screen is mapped when using a different resolution, whether that be smaller or larger. When used correctly sprites positioned on the screen will remain in their relative location (depending on the chosen resolution policy).
- setClearColour(self: pyasge.Renderer, colour: pyasge.Colour) None
The colour used to clear the buffer each frame.
When clearing the window’s content each tick, the colour to use can easily be adjusted by using this function. Calling it means the an empty non-rendered area of the window will know be the colour passed through to this function.
- Setter
Sets the clear colour for the Window.
- Type
Example
>>> self.renderer.setClearColour(pyasge.COLOURS.BLACK)
- setProjectionMatrix(*args, **kwargs)
Overloaded function.
setProjectionMatrix(self: pyasge.Renderer, x: float, y: float, width: float, height: float) -> None
setProjectionMatrix(self: pyasge.Renderer, camera_view: pyasge.CameraView) -> None
- setRenderTarget(self: pyasge.Renderer, arg0: pyasge.RenderTarget) None
Sets a render target to use for rendering.
- setResolutionPolicy(self: pyasge.Renderer, policy: pyasge.ResolutionPolicy) None
Sets the resolution policy to use.
The resolution policy controls how the game’s view will be mapped to the window or to any attached render target. Depending on the policy applied, the view may be centered, bordered, stretched or even maintain it’s aspect ration. This is used when the game view does not directly map to the viewport.
Example>>> self.renderer.setResolutionPolicy(pyasge.ResolutionPolicy.CENTER)
Note
If using a custom viewport, it’s recommended to set it after this function call, to ensure its size is correct.
See also
pyasge.ResolutionPolicy
- setViewport(self: pyasge.Renderer, arg0: pyasge.Viewport) None
The viewport that maps to the rendered window.
- Setter
Updates the renderer’s viewport used for mapping to the window.
- Type
Example
>>> self.renderer.setViewport(pyasge.Viewport(0, 0, 1024, 768))
- property shader
The renderer’s currently assigned shader.
- Getter
Returns the renderer’s current shader.
- Setter
Changes the currently active shader used for rendering.
- Type
Example
>>> self.alpha_shader.uniform("alpha").set(0.2)
>>> self.renderer.shader = self.alpha_shader
>>> self.renderer.render(self.sprite)
RenderTarget
- class pyasge.RenderTarget(self: pyasge.RenderTarget, renderer: ASGE::GLRenderer, width: float, height: float, format: pyasge.Texture.Format, count: int) None
An offscreen render target.
Offscreen render targets can be used to create complex rendering scenes and special effects. By rendering to the texture, it is easy to apply multi-passes with different shaders or even to render the scene within a a scene.
Note
In order to use a render target a renderer is needed. This is because the setup of such targets is GPU and framework dependent.
Example
>>> # Render Function
>>> """ render to texture """
>>> self.renderer.setRenderTarget(self.rt)
>>> self.renderer.setViewport(pyasge.Viewport(0, 0, 1024 / 2, 768 / 2))
>>> self.renderer.render(self.sprite)
>>>
>>> """ render the resultant texture """
>>> self.renderer.setRenderTarget(None)
>>> self.rt.resolve(0)
>>> self.renderer.setViewport(pyasge.Viewport(0, 0, 1024, 768))
>>> self.renderer.render(self.rt_texture)
- property buffers
Returns the most recently resolved textures.
Once a MSAA texture has been resolved, it will be stored in a list of resolved textures. This function returns them. If the MSAA textures have been updated then these will be stale and a resolve function call will be required to update them.
Warning
You need to call resolve to sample the buffers correctly.
Example
>>> """create a new render target and sprite to store the render texture"""
>>> self.rt = pyasge.RenderTarget(self.renderer, 1024 / 2, 768 / 2, pyasge.Texture.Format.RGB, 1)
>>> self.rt_texture = pyasge.Sprite()
>>> self.rt_texture.x = 1024 / 2
>>> self.rt_texture.y = 768 / 2
>>> self.rt_texture.width = 1024 / 2
>>> self.rt_texture.height = 768 / 2
>>> self.rt_texture.attach(self.rt.buffers[0])
See also
- resolve(*args, **kwargs)
Overloaded function.
resolve(self: pyasge.RenderTarget, arg0: int) -> ASGE::Texture2D
Resolves the MSAA texture at specified index.
Before sampling can take place, the multi-sampled images need to be “blited” in to a standard 2D texture. As render targets may have multiple color attachments, this function allows the user to specify which attachment to specifically update.
- param index
The index of the attachment to resolve. A count of 1 is index 0.
- returns
A handle to the resultant updated textures.
- type
Texture
Warning
You need to call resolve to sample the buffers correctly.
See also
resolve(self: pyasge.RenderTarget) -> List[pyasge.Texture]
Resolves all MSAA textures attached to this frame buffer.
Before sampling can take place, the multi-sampled images need to be “blited” in to a standard 2D texture. As render targets may have multiple color attachments, this function loops through all attachments and resolves them into textured that can then be used in normal samplers in the fragment shader.
- returns
A list of all the resultant updated texture.
- type
list[Texture]
Warning
You need to call resolve to sample the buffers correctly.
See also
Resolution
- class pyasge.Resolution
Resolution contains the display and render resolution information.
This data structure contains a collection of useful values that can be used to determine both the game’s design resolution but also the size of the window being rendered. This includes information regarding the viewport and the camera view currently assigned to the renderer. These types of information are often needed when moving between world and screen space.
- property base_aspect_ratio
The base resolution aspect ratio.
- property base_resolution
The base resolution of the game.
The base resolution is simply the resolution the game was designed in. It’s the coordinates used when drawing the game world or even checking for collisions. Depending on the resolution policy being used, the game will be scaled using this resolution. For example if the game resolution is 1280x720 and the window is 1920x1080 and a policy of MAINTAIN is requested; the game world will be scaled perfectly without any black borders. However, your bounds checks such as if x > 1280: remain valid.
The idea behind the base resolution is to make the game independent of the window resolution. Instead the PyASGE will handle the scaling for you, where possible.
- property desktop_aspect_ratio
The desktop’s resolution aspect ratio.
- property desktop_resolution
The resolution of the primary monitor.
Example
>>> resolution = self.renderer.resolution_info.desktop_resolution
>>> print(f"Desktop Resolution: {resolution[0]}x{resolution[1]}@{resolution[2]}Hz")
- property view
The view (camera) that frames the content drawn in the viewport.
The camera view controls the orthogonal projection used to frame the game’s action. To see more of the game world the view can be increased in size. It’s not measured in pixels but rather world space.
- Getter
Returns the camera’s view of the world.
- Type
- property viewport
The viewport that maps to the rendered window.
Whilst the projection matrix (camera view) controls what part of the game scene is being shown, the viewport looks after how it’s view is mapped to the game window or to any attached render targets that are active.
- Getter
Returns the how the view will be mapped to the screen or to the
RenderTarget.- Type
Note
It is the view port that controls the scaling properties when the window is resized. It is used to map the camera view to resultant area on the screen. A viewport does not have to necessarily fit the whole screen either, it can be used for concepts such as picture-in-picture.
- property window_aspect_ratio
The game window’s resolution aspect ratio.
- property window_resolution
The framebuffer size attached to the window.
There is a slight but important distinction between the window size and the framebuffer size. This is due to the window being described in screen space, where as the framebuffer is in pixel space. Often the mapping is the same, but scaling of the window can result in a window having more units than the equivalent pixels. For the time being it’s just easier to expose the width and height of the window in pixel space until a need to differ between the two arises.
Example
>>> window_size = self.renderer.resolution_info.window_resolution
>>> print(f"Window Size: [{window_size[0]}, {window_size[1]}]")
- class pyasge.ResolutionPolicy(self: pyasge.ResolutionPolicy, value: int) None
The resolution policy controls how the viewport will be scaled when the window size does not match the base resolution set for the game. This can be used to control scaling and any offsets applied to keep the content centered. For example using the option SCALE will keep the viewport the same size as the window and stretch any rendered content.
Members:
NONE : Does not apply any offset or scaling to the game.
MAINTAIN : Maintains the aspect ratio and centers the view.
CENTER : Centers but does not scale the viewport.
SCALE : Fills the window which may lead to stretching or distortion.
- property name
Shader
- class pyasge.Shader(self: pyasge.Shader) None
A shader in the context of ASGE is a pixel shader.
Due to the nature of the 2D game engine and for ease of use, the vertex shader is fixed and not easily adjustable, which means the inputs in to the fragment shaders remain consistent. At present only uniform mapping is provided, the addition of extra samplers within the pixel shader is not supported. Provided below is a working fragment shader that can be loaded and used to render a custom alpha channel effect.
Example
#version 330 core
#define FRAG_COLOUR     0
in VertexData
{
    vec2    uvs;
    vec4    rgba;
} fs_in;

// user defined
uniform float alpha;

// engine related
uniform sampler2D image;
layout  (location = FRAG_COLOUR, index = 0) out vec4 fragColor;

void main()
{
    fragColor = vec4(fs_in.rgba.rgb, alpha) * texture(image, fs_in.uvs);
}
>>> self.renderer.shader = self.alpha_shader  # activates a shader globally
>>> self.renderer.render(self.sprite)         # renders a sprite using it
>>> self.renderer.shader = None               # resets and uses the default shader
>>> self.renderer.render(self.sprite)         # renders a sprite using the default shader
Default constructor.
- property id
Retrieves the shaders unique ID.
- uniform(self: pyasge.Shader, arg0: str) pyasge.Value
Retrieves a uniform by its str name. This can be used to update the value of the global shader data. The name and type must match the variable defined inside the shader i.e. a uniform named alpha of type float must be addressed as such.
Example
>>> self.shader.uniform("alpha").set(float(1))
- property uniforms
List of all mapped and available uniforms.
Sprite
- class pyasge.Sprite(self: pyasge.Sprite) None
A sprite is the simplest renderable primitive in the game.
Flip flags are an easy to control the rendering of the texture’s UV coordinates. In default state, the texture is rendered from top left. When flipped the UV positions are inverted.
- class AttachFlags(self: pyasge.Sprite.AttachFlags, value: int) None
Attach mode flags.
When attaching a texture to the sprite, by default the sprite’s settings will be reset to match the newly attached texture. These flags allow the user to prevent certain resets from occurs.
Members:
DEFAULT : Clobbers the existing sprite’s settings
KEEP_DIMS : Retain the sprite’s dimensions
KEEP_UVS : Retain the sprite’s UV settings
KEEP_TINT : Retain the sprite’s tint
KEEP_ROTATION : Retain the sprite’s rotation
GENERATE_MIPS : Generate a new set of MipMaps for the texture
- property name
- class FlipFlags(self: pyasge.Sprite.FlipFlags, value: int) None
Texture flipping flags.
Flip flags are an easy to control the rendering of the texture’s UV coordinates. In default state, the texture is rendered from top left. When flipped the UV positions are inverted.
Members:
NORMAL : Texture is not flipped.
FLIP_X : Texture is flipped on the x axis.
FLIP_Y : Texture is flipped on the y axis.
FLIP_XY : Texture is flipped diagonally.
FLIP_BOTH : Texture is flipped on both axis.
- property name
- class SourceRectIndex(self: pyasge.Sprite.SourceRectIndex, value: int) None
Source rectangle helper.
The source rectangle indices can be accessed using these enum values to prevent the use of magic numbers. It aids with clarity when the individual UV indices are being accessed.
Members:
START_X : Starting point on the x axis
START_Y : Starting point on the y axis
LENGTH_X : The length on the x axis
LENGTH_Y : The length on the y axis
- property name
- property alpha
Alpha channel to control the opacity of the sprite.
This field let’s you control the opacity of the sprite by modifying the alpha channel during the render cycle. 1.0F is opaque and 0.0F is completely transparent.
- Getter
Returns value for the alpha channel.
- Setter
Sets the new value for the alpha channel.
- Type
- attach(*args, **kwargs)
Overloaded function.
attach(self: pyasge.Sprite, texture: pyasge.Texture, attach_mode: pyasge.Sprite.AttachFlags) -> bool
Attaches a
Textureobject to the sprite.When sprites are rendered they sample images or textures to colour the pixels. You can use this function to replace the texture that’s being used during the rendering phase.
- texture
The replacement texture to attach
- type
- attach_mode
The flags to apply when attaching the texture to the sprite
- type
pyasge.Sprite.AttachMode
Example>>> self.sprite = pyasge.Sprite() >>> self.texture = self.renderer.createNonCachedTexture("/data/image.png") >>> self.sprite.attach(texture, pyasge.Sprite.AttachFlags( pyasge.Sprite.AttachFlags.KEEP_UVS | pyasge.Sprite.AttachFlags.KEEP_ROTATION))
See also
pyasge.Texture
attach(self: pyasge.Sprite, texture: pyasge.Texture) -> bool
Attaches a
Textureobject to the sprite.When sprites are rendered they sample images or textures to colour the pixels. You can use this function to replace the texture that’s being used during the rendering phase.
- texture
The replacement texture to attach
- type
Example>>> self.sprite = pyasge.Sprite() >>> self.texture = self.renderer.createNonCachedTexture("/data/image.png") >>> self.sprite.attach(self.texture)
See also
pyasge.Texture
- property colour
Controls the tinting of the sprite.
- Getter
The sprite’s colour.
- Setter
Sets the sprite’s colour.
- Type
- dimensions(self: pyasge.Sprite) Tuple[float, float]
Gets the height and the width of the sprite.
Retrieves the requested width and height to render the sprite. This does not relate to the texture attached to the sprite, rather the size and shape the texture will appear on the screen. the inverse textures pixels will be sampled.
- property flip_flags
Controls the flipping of the attached texture.
Flipping the sprite will simply swap the sampled UV coordinates. Meaning the inverse textures pixels will be sampled. Flipping the axis will mean samples from the [1,0] domain instead of [0,1].
- Getter
Returns the current flip state of the sprite.
- Setter
Sets the sprites flip flags.
- Type
Example
>>> sprite.flip_flags = pyasge.Sprite.FlipFlags.FLIP_X
>>> sprite.flip_flags = pyasge.Sprite.FlipFlags.FLIP_Y
See also
- getLocalBounds(self: pyasge.Sprite) pyasge.SpriteBounds
Retrieves the sprite’s 4 points in local space.
Simply returns the sprite’s original and unmodified dimensions. No transforms will be applied, meaning rotation and scaling are absent and the points can be considered as local or model space. These points can be used as the starting basis of an AABB or for custom collision detections.
- Returns
The four vertex bounds of the sprite in local space.
- Return type
Example
>>> import pyasge
>>> sprite = pyasge.Sprite()
>>> sprite.loadTexture("/data/game/background.jpg")
>>> print(sprite.getLocalBounds())
Warning
When comparing bounding volumes, ensure they are all generated from the same space. Mixing model and world bounding boxes will not have the equivalent transforms applied.
See also
- getTexture(self: pyasge.Sprite) pyasge.Texture
Retrieves the texture attached to the sprite.
Will return a reference to the currently active texture assigned to to the sprite. It’s possible that a sprite may have no texture, so it contents should be checked to make sure it is not
Noneto prevent undefined behaviour.- Returns
The texture associated with the sprite. May be None or null.
- Return type
Warning
As a reference is being returned, the texture is only safe to access whilst it has not been destroyed. Once the texture’s memory is freed, this reference will no longer be valid.
Example
>>> import pyasge
>>> sprite = pyasge.Sprite()
>>> if sprite.getTexture is not None:
>>>     print("sprite has a texture attached")
See also
- getWorldBounds(self: pyasge.Sprite) pyasge.SpriteBounds
Retrieves the sprite’s 4 points in transformed world space.
Returns the 4 vertices that delimit the sprite’s position in world space. Any transforms (scaling and rotation) have already been applied. This is useful for when you need to know the projected location i.e. calculating a bounding volume.
- Returns
The four vertex bounds of the sprite in world space.
- Return type
Example
>>> import pyasge
>>> sprite = pyasge.Sprite()
>>> sprite.loadTexture("/data/game/background.jpg")
>>> print(sprite.getWorldBounds())
Warning
When comparing bounding volumes, ensure they are all generated from the same space. Mixing model and world bounding boxes will not have the equivalent transforms applied.
See also
- property height
The height to render the sprite.
The height controls how tall the sprite will be rendered. It does not directly control the source rectangle and will stretch the texture attached to it, to ensure it meets the requested height.
- Getter
Returns the requested height of the sprite.
- Setter
Sets the requested height of the sprite.
- Type
Example
>>> import pyasge
>>> sprite = pyasge.Sprite()
>>> print(sprite.width)
>>> sprite.height = 500
- isFlippedOnX(self: pyasge.Sprite) bool
Checks to see if the texture is flipped on the X axis.
It is possible to flip the UV coordinates used on the sprite’s texture. This will check to see if the X axis is flipped.
- Returns
If the texture is flipped on the X axis.
- Return type
- isFlippedOnXY(self: pyasge.Sprite) bool
Checks to see if the texture is flipped diagonally.
It is possible to flip the UV coordinates used on the sprite’s texture. This will check to see if the XY axis are flipped with each other.
- Returns
If the texture is flipped diagonally.
- Return type
- isFlippedOnY(self: pyasge.Sprite) bool
Checks to see if the texture is flipped on the Y axis.
It is possible to flip the UV coordinates used on the sprite’s texture. This will check to see if the Y axis is flipped.
- Returns
If the texture is flipped on the Y axis.
- Return type
- loadTexture(self: pyasge.Sprite, file_path: str) bool
Loads a texture and attaches it to the sprite.
Uses a texture caching system to attempt to load the file from the ASGE IO subsystem. If it loads successfully, the texture is cached and the dimensions set according to the source image. A boolean is used to return whether or not it loaded successfully.
- Parameters
filename (str) – The texture (sprite) filename to load.
- Returns
Whether or not it was successfully loaded
- Return type
Example
>>> import pyasge
>>> sprite = pyasge.Sprite()
>>> if sprite.loadTexture("/data/game/background.jpg" is True:
>>>   print("texture loaded")
- property midpoint
Calculates the mid-point of the sprite.
Sprites origins are normally 0,0, which maps to the top left. This function returns the mid-point of the sprite based on its width and height and also the x,y position it’s currently in.
- Getter
Will return the calculated midpoint of the sprite based on its position in the world and its length and width. This function automatically applies the sprite’s scale.
- Type
Note
This midpoint is scaled using the sprites scale factor.
Example
>>> # set a camera to follow the player's mid-point
>>> self.camera.lookAt(self.data.player.midpoint)
- property opacity
Sets the opacity of the sprite.
This field let’s you control the opacity of the sprite by modifying the alpha channel during the render cycle. 1.0F is opaque and 0.0F is completely transparent.
- Getter
Returns value for the alpha channel.
- Setter
Sets the new value for the alpha channel.
- Type
- property rotation
Rotation (in radians) to apply to the rendered sprite.
The angle of rotation is used to rotate the sprite around it’s origin. The origin defaults to the mid-point of the sprite. The angle of rotation is expressed in radians.
- Getter
Returns the sprites angle of rotation in radians.
- Setter
Sets the rotation of the sprite in radians.
- Type
Note
\(degrees = radians * 180^\theta\ / pi\)
- property scale
Scale to apply to the sprite.
The scale can be adjusted to automatically make the sprite render larger or smaller than it’s original size. This allows for on the fly alterations without having to edit the sprite’s width and height. The scaling operation is performed uniformly in both axis.
- Getter
Returns the scale factor.
- Setter
Sets the scale factor.
- Type
Example
>>> import pyasge
>>> sprite = pyasge.Sprite()
>>> sprite.scale = 5
- setMagFilter(self: pyasge.Sprite, magfilter: pyasge.MagFilter) None
Sets the magnification filter on the attached texture.
Use this function to alter the texture sampling behaviour when the attached texture is being read during the rendering phase. Low resolution artwork, often known as pixel art should use nearest neighbour to retain the crispness of the original.
- Parameters
magfilter (MagFilter) – The magnification filtering to apply to the texture.
Example
>>> import pyasge
>>> sprite = pyasge.Sprite()
>>> sprite.loadTexture("/data/image.png")
>>> sprite.scale = 5
>>> sprite.setMagFilter(pyasge.MagFilter.NEAREST)
See also
- property shader
Example
>>> self.sprite = pyasge.Sprite()
>>> self.shader = self.renderer.loadPixelShader("/data/shaders/red.frag")
>>> self.sprite.shader = shader
- property src_rect
Source rectangle for the texture.
The source rectangle allows the developer to specify what part of a texture should be sampled during rendering. This allows the use of sprite sheets, where for example each cell might represent an animation. By changing the source rectangle, a single cell of animation could be selected, ignoring the others.
- Returns
Direct access to the sprite’s source rectangle.
- Return type
numpy.ndarray[numpy.float]
Example
Selecting a specific sprite on a sprite sheet requires setting the source rectangle’s starting position and its length. In the example that follows, a sprite sheet is loaded and then a single cell is used for rendering by modifying the source rectangle’s starting x position and its length.
Note
Notice how the width of the sprite itself is altered. If we don’t change the width of the sprite to match, it will render the source rectangle stretched, which in some situations may actually be desirable i.e. when stretching a background image.

>>> import pyasge
>>> '''selecting a sprite within a sprite sheet'''
>>> sprite_sheet = pyasge.Sprite()
>>> sprite_sheet.loadTexture("/data/spritesheet.png")
>>> sprite_sheet.src_rect[pyasge.Sprite.SourceRectIndex.START_X] = 227
>>> sprite_sheet.src_rect[pyasge.Sprite.SourceRectIndex.LENGTH_X] = 44
>>> sprite_sheet.width = 44

See also
- property texture
The texture attached to the sprite.
When sprites are rendered they sample images or textures to colour the pixels. You can use this property to replace the texture that’s being used during the rendering phase or to retrieve the currently attached one.
- Getter
Will return a reference to the currently active texture assigned to to the sprite. It’s possible that a sprite may have no texture, so it contents should be checked to make sure it is not
Noneto prevent undefined behaviour.- Setter
Attaches a
Textureobject to the sprite. This will replace the texture that’s being used during the rendering phase.- Type
Example
>>> import pyasge
>>> sprite = pyasge.Sprite()
>>> if sprite.texture is not None:
>>>     print("sprite has a texture attached")
Warning
As a reference is being returned, the texture is only safe to access whilst it has not been destroyed. Once the texture’s memory is freed, this reference will no longer be valid.
See also
- property width
The width to render the sprite.
The width controls how wide the sprite will be rendered. It does not directly control the source rectangle and will stretch the texture attached to it, to ensure it meets the requested width.
- Getter
Returns the requested width of the sprite.
- Setter
Sets the requested width of the sprite.
- Type
Example
>>> import pyasge
>>> sprite = pyasge.Sprite()
>>> print(sprite.width)
>>> sprite.width = 500
- property x
Sprite’s position on the x axis
Used to position the sprite in world space, which in turn is used for rendering the sprite on the orthographic viewport. The x axis refers to the horizontal positioning of the sprite and is based on the top-left of the sprite.
- Getter
Returns the sprite’s x position.
- Setter
Sets the sprite’s x position.
- Type
Example
>>> import pyasge
>>> sprite = pyasge.Sprite()
>>> print(sprite.x)
>>> sprite.x = 250
- property y
Sprite’s position on the y axis
Used to position the sprite in world space, which in turn is used for rendering the sprite on the orthographic viewport. The y axis refers to the vertical positioning of the sprite and is based on the top-left of the sprite.
- Getter
Returns the sprite’s y position.
- Setter
Sets the sprite’s y position.
- Type
Example
>>> import pyasge
>>> sprite = pyasge.Sprite()
>>> print(sprite.y)
>>> sprite.y = 250
- property z_order
The rendering order (layer) of the sprite.
When rendering it is often necessary to control the order in which sprites, text or even UI elements are rendered. For example, if parts of the UI were rendered before the background they would end up hidden. Z-ordering is a common approach to controlling this behaviour and is essential when using batch rendering.
- Getter
The currently assigned z-order value.
- Setter
Replaces the z-ordering of the sprite.
- Type
np.uint8
Tip
Typically, an object with a lower z-order will be rendered before one with a higher z-order. In PyASGE you can use the z_order property to control the render ordering.
Example
In this image you can see an example of when the z-order for a sprite is not set correctly. The blocks below the player should have a lower z-order than the player’s sprite, to ensure they are rendered first.

GameDev @ StackExchange
SpriteBounds
- class pyasge.SpriteBounds
A simple helper class for describing a sprite’s boundaries.
Attributes
|
Top left |
|
Top right |
|
Bottom right |
|
Bottom left |
Text
- class pyasge.Text(*args, **kwargs)
Text is designed to allow rendering of text to the screen.
Rendering text to a screen is not a simple process. There are lots of parameters involved, which can result in many different overloaded render functions. To resolve this, the pyasge.Text was created. All the information needed to successfully render text to the screen is stored within the struct. This includes positioning, colours, scaling, the text and even the font face to use.
Advantages of using this class allow a single instance to be constructed and used repeatedly as well as the ability to add additional features to the Text class without having to modify the renderer API.
Positioning
There are always a lot of questions around positioning of text on the screen. The issue comes from the x and y actually controlling the position of the baseline. The baseline is the point at which all characters should lay along and allows consistent positioning of text irrespective of the strings context.

The FreeType project
Example
>>> """load font and create text instance"""
>>> self.font = self.renderer.loadFont("/data/fonts/font.ttf", 40)
>>> self.text = pyasge.Text(self.font, "Hello World")
>>> self.text.colour = pyasge.COLOURS.AQUA
>>> self.text.opacity = 0.5
>>> self.text.scale = 0.75
>>> self.text.position = pyasge.Point2D(200, 200)
>>> self.renderer.renderText(self.text)
Warning
In order for text to be rendered and for any width and height calculations to be performed a font face is required. If a font face is not provided the width and height functions will return 0 and the renderer will fallback on the engine’s debug font for rendering.
Overloaded function.
__init__(self: pyasge.Text, Font: pyasge.Font) -> None
__init__(self: pyasge.Text, Font: pyasge.Font, string: str) -> None
__init__(self: pyasge.Text, Font: pyasge.Font, string: str, x: int, y: int) -> None
__init__(self: pyasge.Text, Font: pyasge.Font, string: str, x: int, y: int, colour: pyasge.Colour) -> None
- property colour
The colour to use.
Text rendering supports the full RGB range of colours. Adjusting this value will control the rendered output (assuming no custom pixel shaders are in use). Colours are described using three floats, ranging from [0,1], with 0 being an absence of colour (black) and 1.0 being fully lit (white).
- Getter
Returns the current colour being used for rendering.
- Setter
Updates the colour assigned to the text render.
- Type
See also
- property font
The font face attached to the text.
- Getter
Returns the currently attached font face.
- Setter
Sets the font face to use for rendering.
- Type
- property height
Returns the expected rendered height of the text.
Attempts to calculate the output height of the text using the assigned font face. Scaling will also have an impact on the end result.
- Returns
The height of the rendered string.
- Type
- property line_spacing
Attempts to calculate the spacing between lines.
- Returns
The expected spacing between each line of text.
- Type
- property local_bounds
The text object’s 4 points in local space.
Whilst this does not provide the absolute positioning of the text in the game world, it does allow an easy way to calculate the bounding box dimensions of the rendered text i.e. how wide and tall it is.
- Returns
The four vertex bounds of the text object.
- Type
Example
>>> self.font = self.renderer.loadFont("/data/fonts/font.ttf", 40)
>>> self.text = pyasge.Text(self.font, "Hello World")
>>> print(self.text.getLocalBounds)
See also
- property opacity
The opacity of the text.
Controls the alpha channel used to render the text. Values closer to 0 will make the text more transparent and values closer to 1 will make it more opaque.
- Getter
Returns the text’s opacity.
- Setter
Sets the text’s rendered opacity by adjusting the alpha channel.
- Type
- property position
The baseline position to use.
The position property controls the very starting point of the baseline. All glyphs (characters) rendered should align evenly on the baseline. This is important as it allows lines of text to follow a line evenly.
- Getter
The current baseline position.
- Setter
The new baseline position to use for rendering.
- Type
- property scale
The scale to apply to the text output.
- Getter
Returns the text’s scale factor.
- Setter
Updates the scale factor to use.
- Type
- property string
The contents of the text to render.
- Getter
Returns the current string.
- Setter
Sets a new string for calculating bounds and rendering output.
- Type
- validFont(self: pyasge.Text) bool
Does the text instance have a valid font to render with?
Checks to see if a valid font has been attached to the text object. An invalid font would be one where the value is None
- Returns
True if the font is not None
- Type
- property width
Returns the expected rendered width of the text.
Attempts to calculate the output width of the text using the assigned font face. Scaling will also have an impact on the end result.
- Returns
The width of the rendered string.
- Type
- property world_bounds
The text object’s 4 points in transformed world space.
Calculates the width and height of the text in local space and then positions it within a bounding box that it is subsequently transformed in to world space.
- Returns
The four vertex bounds of the text in world space.
- Type
Example
>>> self.font = self.renderer.loadFont("/data/fonts/font.ttf", 40)
>>> self.text = pyasge.Text(self.font, "Hello World")
>>> print(self.text.world_bounds)
See also
- property x
The text’s baseline position on the X axis.
The property controls the very starting point of the baseline on the X axis. All glyphs (characters) rendered should align evenly on the baseline. This is important as it allows lines of text to follow a line evenly.
- Getter
The current baseline starting x position.
- Setter
The new baseline position on the x axis to use for rendering.
- Type
- property y
The text’s baseline position on the Y axis.
The property controls the position of the baseline on the Y axis. All glyphs (characters) rendered will be positioned horizontally level and this property controls the vertical placement of the line.
- Getter
The current baseline starting y position.
- Setter
The new baseline position on the y axis to use for rendering.
- Type
- property z_order
The z-order level to use.
Z-ordering controls the rendering order. This is important to ensure certain elements of the game are rendered before others. For example, a text element may prevent itself from being blocked by other elements by increasing it’s Z order, meaning it will be rendered last.
- Getter
Returns the text’s scale factor.
- Setter
Updates the scale factor to use.
- Type
np.uint8
Texture
- class pyasge.Texture(self: pyasge.Texture, width: float = 0, height: float = 0) None
A texture which can attach to the GPU
Initially the texture is empty and does not get allocated on the GPU. On the first retrieval of the pixel buffer, the memory will be allocated and a handle to the pixel buffer’s contents will be created. You are then free to manipulate this data locally, before re-uploading it to the GPU at a later point in time by signalling the pixel buffer
uploadfunction.See also
- class Format(self: pyasge.Texture.Format, value: int) None
Pixel format of the texture.
These types can be used to calculate the bit-depth of each pixel. This is important when manually iterating or updating the pixel buffers, as the stride between various pixels will depend on the format used.
Members:
MONOCHROME : The texture is monochromatic.
MONOCHROME_ALPHA : The texture is monochromatic and has an alpha channel.
RGB : There are Red, Green & Blue channels present.
RGBA : There are RGB plus alpha channels present.
- property name
- class UVWrapMode(self: pyasge.Texture.UVWrapMode, value: int) None
Modes that controlling the UV texture wrapping
When sampling textures and using UV coordinates outside of the normalised range, wrapping modes can be used to control the resultant sampled pixel. For example, REPEAT will continuously wrap the texture. This is good for when you want to sample outside the normal [0,1] range but still obtain a resultant pixel. A use case for this is a scrolling background layer.
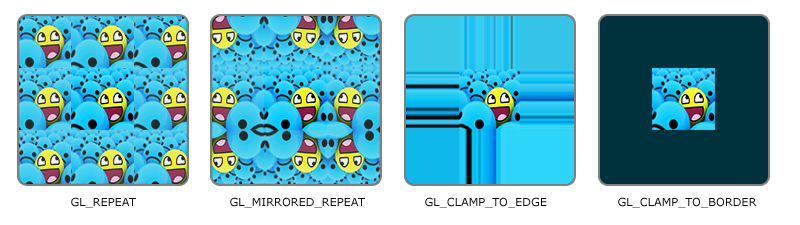
learnopengl.com
Members:
CLAMP : Clamps the texture to [0,1].
REPEAT : Repeats the texture.
MIRROR : Mirrors the image with each repeat.
- property name
- property buffer
The texture’s pixel buffer.
Each texture’s data is uploaded and resident on the GPU. Using a
PixelBuffer, it is possible to download the data and manipulate it locally, before re-uploading the changes. Pixel buffers are allocated on first use and will download from the GPU automatically upon creation.- Returns
The host copy of the texture’s pixel data.
- Return type
- property format
The texture’s designated pixel format.
- Returns
The pixel format for the texture.
- Return type
- property id
Retrieves the GPU ID allocated to the texture
When allocating space for the texture on the GPU, a handle is generated. This unique ID represents the handle. Textures that share the same handle use the same region of GPU memory. If the id is 0 then it is safe to the assume that the texture hasn’t yet been allocated.
- Returns
the unique id of the GPU data
- Return type
unsigned int
- setMagFilter(self: pyasge.Texture, filter: pyasge.MagFilter) None
Updates the magnification filter.
Magnification filters control how textures are scaled when rendered at a higher resolution. The default is
linearfiltering, butnearest neighbouris also available.- Parameters
filter (MagFilter) – The filtering algorithm to apply when scaling
See also
Note
- setUVMode(self: pyasge.Texture, s: pyasge.Texture.UVWrapMode = <UVWrapMode.CLAMP: 0>, t: pyasge.Texture.UVWrapMode = <UVWrapMode.CLAMP: 0>) None
Set the wrapping mode used for UV coordinates.
When sampling the texture, UV coordinates outside of the range of [0,1]
can either be clamped or repeated. It is also possible to clamp the UV range in one direction, and repeat in another as both directions (s,t) are controlled independently of each other. The repeating technique can be used to create simple animations such as scrolling backgrounds.
- Parameters
s (pyasge.Texture.UVWrapMode) – The wrapping mode to use when sampling outside the [0,1] range in the x axis.
t (pyasge.Texture.UVWrapMode) – The wrapping mode to use when sampling outside the [0,1] range in the y axis.
learnopengl.com
Example
>>> sprite = pyasge.Sprite()
>>> sprite.loadTexture("scrolling_bg.png")
>>> sprite.texture.setUVMode(Texture.UVWrapMode.REPEAT, Texture.UVWrapMode.REPEAT)
See also
- updateMips(self: pyasge.Texture) None
Rebuilds the mip-maps used for minification.
Tile
- class pyasge.Tile(*args, **kwargs)
An PyASGE supported tile.
Tiles, whilst sharing much of the same functionality as the Sprites are conceptually quite different. Instead they are used to build more complex scenes and game maps. Because of this their position is normally dictated by the map itself and typically consists of using rows, columns and tile sizes to determine their exact positioning.
The aim of this class is to easily allow this kind of functionality to exist within PyASGE. Instead of having to construct instances of Sprites with their own positional data, you can use a Tile instead.
When rendering a Tile you will need to provide the XY position that it’s to appear in World Space. Remember that by default origins in PyASGE for positions (not rotations) are calculated from the top-left.
Mozilla’s developer documentation (https://developer.mozilla.org/en-US/docs/Games/Techniques/Tilemaps) does a great job of introducing tile maps and how conceptually they operate. This might help if you’re unsure about when you would use a Tile instead of a Sprite.
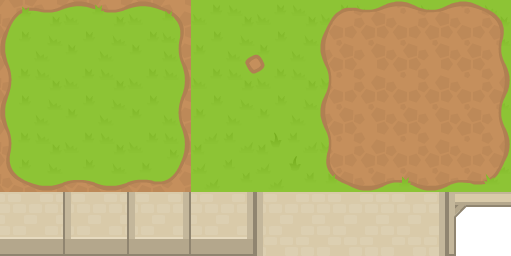
Mozilla Developer Documentation: Tilemaps
Example
>>> # create a tile
>>> pyasge_tile = pyasge.Tile()
>>> pyasge_tile.texture = renderer.loadTexture(filename)
>>> pyasge_tile.texture.setMagFilter(pyasge.MagFilter.NEAREST)
>>> pyasge_tile.width = 32
>>> pyasge_tile.height = 32
>>> pyasge_tile.src_rect = [0,0,32,32]
>>> pyasge_tile.visible = True
>>> # render a tile map by looping through layers of tiles
>>> for layer in self.map:
>>>   for row_index, row in enumerate(layer[1]):
>>>     for col_index, tile in enumerate(row):
>>>       if tile:
>>>          renderer.render(tile,
>>>                          col_index * self.tile_size[0],
>>>                          row_index * self.tile_size[1])
See also
Overloaded function.
__init__(self: pyasge.Tile) -> None
__init__(self: pyasge.Tile, arg0: pyasge.Tile) -> None
- property height
Controls alpha for the rendered tile
- load(self: pyasge.Tile, arg0: str) bool
- property opacity
Controls alpha for the rendered tile
- property rotation
Rotation for the tile
- property src_rect
Source rectangle for the texture.
The source rectangle allows the developer to specify what part of a texture should be sampled during rendering. This allows the use of sprite sheets, where for example each cell might represent an animation. By changing the source rectangle, a single cell of animation could be selected, ignoring the others.
- Returns
Direct access to the source rectangle used for texture mapping.
- Return type
numpy.ndarray[numpy.float]
Example
Selecting a specific tile on a sprite sheet requires setting the source rectangle’s starting position and its length. In the example that follows, a sprite sheet is loaded and then a single cell is used for rendering by modifying the source rectangle’s starting x position and its length.
>>> pyasge_tile = pyasge.Tile()
>>> pyasge_tile.texture = renderer.loadTexture(filename)
>>> pyasge_tile.src_rect = [0, 0, 44, 227]
>>> pyasge_tile.width = 44
- property texture
The texture attached to the tile.
When tiles are rendered they sample images or textures to colour the pixels. You can use this property to replace the texture that’s being used during the rendering phase or to retrieve the currently attached one.
- Getter
Will return a reference to the currently active texture assigned to to the tile. It’s possible that a tile may have no texture, so it contents should be checked to make sure it is not
Noneto prevent undefined behaviour.- Setter
Attaches a
Textureobject to the sprite. This will replace the texture that’s being used during the rendering phase.- Type
Warning
As a reference is being returned, the texture is only safe to access whilst it has not been destroyed. Once the texture’s memory is freed, this reference will no longer be valid.
See also
- property tint
Rotation for the tile
- property width
Controls alpha for the rendered tile
- property z
Controls alpha for the rendered tile
Value
- class pyasge.Value
A generic value storing class.
The value class uses std::any to store an object of any type. By using this templated version the data can be stored internally and access to it is controlled safely via the std::any wrapper. If an incorrect type is used an exception is thrown. In python this of less interest, but is used in ASGE for storing things like uniform mappings.
Example
>>> self.alpha_shader = self.renderer.loadPixelShader("/data/shaders/alpha.frag")
>>> print(self.alpha_shader.uniform("alpha").value)
>>> self.alpha_shader.uniform("alpha").set(0.2)
- set(*args, **kwargs)
Overloaded function.
set(self: pyasge.Value, value: bool) -> None
set(self: pyasge.Value, value: int) -> None
set(self: pyasge.Value, value: float) -> None
set(self: pyasge.Value, value: List[bool[2]]) -> None
set(self: pyasge.Value, value: List[float[2]]) -> None
set(self: pyasge.Value, value: List[float[3]]) -> None
set(self: pyasge.Value, value: List[float[4]]) -> None
set(self: pyasge.Value, value: List[List[float[2]][2]]) -> None
set(self: pyasge.Value, value: List[List[float[4]][4]]) -> None
Viewport
- class pyasge.Viewport(*args, **kwargs)
Viewports are a way of framing the rendering and control the mapping to the destination target, be that a pyasge.RenderTarget or a window.
For example you could create a viewport that only consumed half the render window and render a camera’s view in to it. This could allow for more complex solutions such as split screen support.
Example
In the following example, the game screen is split into half (vertically) with one viewport on the left and the other on the right. A camera is then used to frame the action, before one sprite is rendered and then another.
>>> def __init__(self, settings):
>>>   pyasge.ASGEGame.__init__(self, settings)
>>>
>>>   '''game window is 384x256 pixels, so reduce half camera width'''
>>>   self.camera = pyasge.Camera((-(384 * 0.25), -256 / 2), 384 / 2, 256)
>>>
>>>   '''load two sprites, one for each viewport'''
>>>   self.sprite1 = pyasge.Sprite()
>>>   self.sprite1.loadTexture("/data/character_zombie_idle.png")
>>>   self.sprite2 = pyasge.Sprite()
>>>   self.sprite2.loadTexture("/data/character_robot_idle.png")
>>>
>>> def render(self) -> None:
>>>   self.renderer.setProjectionMatrix(self.camera.view)
>>>   self.renderer.setViewport(pyasge.Viewport(0, 0, 384 / 2, 256))
>>>   self.renderer.render(self.sprite)
>>>   self.renderer.setViewport(pyasge.Viewport(384 / 2, 0, 384 / 2, 256))
>>>   self.renderer.render(self.sprite2)
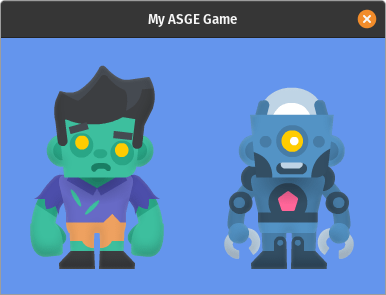
Note
Changing the size of the viewport will directly impact how the rendered sprites are mapped to the screen. This can result in distortion when your viewport has a different aspect ratio compared to the camera.
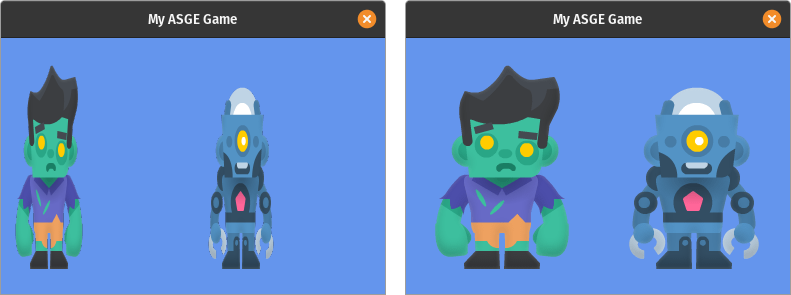
Overloaded function.
__init__(self: pyasge.Viewport) -> None
__init__(self: pyasge.Viewport, arg0: float, arg1: float, arg2: float, arg3: float) -> None
__init__(self: pyasge.Viewport, arg0: pyasge.Viewport) -> None
- property h
The viewports height.
- property w
The viewports width.
- property x
The viewports starting x position.
- property y
The viewports starting y position.
Vsync
- class pyasge.Vsync(self: pyasge.Vsync, value: int) None
Vertical sync modes.
Not currently working when using Python bindings.
Members:
ENABLED : Forces vsync at all times. FPS will be controlled by monitors refresh.
ADAPTIVE : Enables vsync when able to meet monitor’s refresh, disables when below.
DISABLED : Allow the game to run unrestricted.
- property name
WindowMode
- class pyasge.WindowMode(self: pyasge.WindowMode, value: int) None
Input Event.
Input events are signalled when specific inputs are detected. These include key presses, mouse button clicks, mouse movements and mouse scrolling. When the framework receives one of these events, it forwards the data packaged in one of these EventType classes. They contain all the relevant information about the event itself.
Members:
FULLSCREEN : Present the game in full-screen, changing resolution if necessary.
WINDOWED : Present the game in a window.
BORDERLESS_WINDOW : Present the game in a borderless window.
BORDERLESS_FULLSCREEN : Present the game in a fullscreen borderless window, maintaining the desktop resolution and settings
- property name